How to check the starter for proper operation

Despite the great variety of car models, the starters used in them have almost the same design and work on the same principle.
The figure shows the electric starter circuit used in cars.

The starter operates in the following sequence. When the ignition key is turned, the S contacts are closed and power from the battery is supplied to the windings of the retracting 3 and holding 4 relays simultaneously. Anchor 5 of the retracting relay moves inside the relay core and thereby, by means of the rod 6, causes the lever 7 to turn, pushing its other end, through the drive clutch 8, the gear 10 into meshing with the ring gear of the flywheel 11. At this time, the starter motor is energised by the car battery via winding 3 and begins to rotate at low speed. When the armature presses the contact plate 2 against the contact bolts 1, power to the electric motor 12 is supplied directly through the contacts, bypassing the retracting winding. The resistance of the motor supply circuit is reduced and the motor reaches its maximum speed. At the same time, the gear 10 through the flywheel ring gear transmits torque to the crankshaft and the engine starts. When the crankshaft revolutions begin to exceed the starter revolutions, the free-wheel clutch 9 comes into play.
The gear stays engaged as long as the contact bolts are closed. Also, as you can see from the figure, the retracting and retaining windings, when the S contact is open, are connected to the battery in series. And since they have different winding direction but the same number of turns – they create magnetic fluxes of the same magnitude but opposite in direction, thus neutralising each other. The contact plate, under the influence of the spring, moves to the right and opens the circuit, at the same time acting on the lever 7 and disengaging the pinion from the flywheel.
How to check the starter without removing it from the car
Let's look at common signs of starter failure and learn how to check the starter at home.
How to check the starter at home.
Starter engagement and subsequent unintentional disengagement may be accompanied by clicks from the starter relay or starter pull relay. The main causes of this problem include:
- A defective or discharged battery.
- Low ambient temperature.
- Oxidation of wire contacts, as well as their loose fixation on the battery terminals, traction relay and car body.
- Malfunction of the starter relay and/or starter relay pull relay.
It is known that a decrease in electrolyte temperature to –20°C leads to a 20% reduction in the capacity of the battery. Also at low temperatures increases the viscosity of the electrolyte, which prevents its contact with the active mass of the electrode plates and thereby reduces the voltage at the battery terminals. Based on the above, check the starter on the battery at low temperatures will be difficult. If you add to this the possible oxidation of contacts on the terminals of connecting wires, the reasons for spontaneous disconnection of the starter become clear.
Further assess the degree of contact oxidation by measuring the voltage at the battery terminals and at the terminal of the traction relay, and the starter housing at rest, and then when the starter is switched on for 3-4 seconds. The difference of measured readings should not exceed 1.5 V (optimally, they should be the same). It should be remembered that the voltage at the terminals of a serviceable 12-volt battery should be greater than or equal to 10 V. For a 24-volt battery, the voltage drop should not exceed 4 V (i.e. UACB≥20 V). If this is not the case, the lugs of the power leads must be cleaned and checked for tightness.
Traction relay
The functions of the traction relay are as follows:
- Meshing of the starter drive gear with the engine flywheel crown.
- Closing the starter motor power supply circuit.
Although retract relays from different manufacturers differ in the number of windings, method of fixation on the starter, design of contact terminals, they all share the same functions and principle of operation, similar to a conventional solenoid.

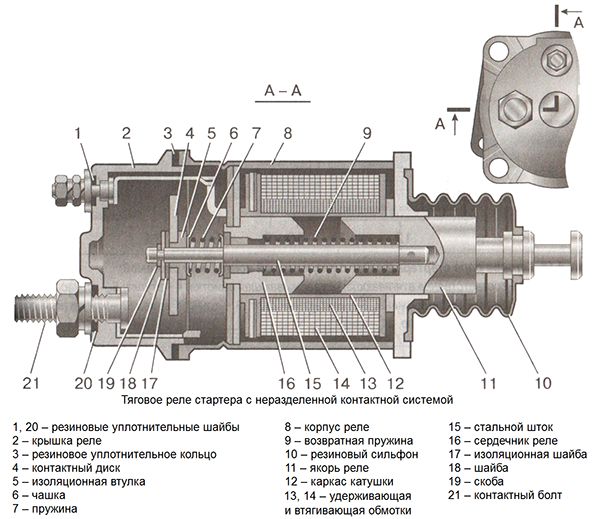
If you look at the cross-section of the traction relay in the picture above, you can see that it contains two windings (retaining 13 and retracting 14) wound on a brass bushing where the armature 11 moves, acting on a rod 15 with a movable contact disc 4. Two immovable contact bolts are fixed in the plastic cover 2. The contact disc can be of various shapes (rectangular, round or shaped) and is mounted isolated from the stem. One of the most common problems with this contact pair is burning or welding of the contacts. This is the first reason why it is not recommended to keep the starter on for more than 5-6 seconds, and the second reason is accelerated discharge of the battery.
How to check the starter relay
To check the starter traction relay, you should connect its terminals to the battery, observing the polarity. If the device is faulty, the starter pinion will move and you will hear a characteristic click.
We have a video on our YouTube channel that will show you how to test the starter with a multimeter (using ordinary current clamps) if you have a car battery, as well as localise the cause of the fault.
How to test the starter with a multimeter (using ordinary current clamps), and localise the cause of the fault.


